Tuesday, December 30, 2008
Redd Up Yer Head Hat
Having a bad hair day? Yunz best redd up yer head with my new red hat! I took my sack of yarn to Brooke's and while we watched the entire Lord of the Rings extended dvd, I crocheted several hats. The last hat that I gave up on was the red hat, which ended up being my favorite! I used an old pattern for a beret, but added a brim. I was frustrated that the brim wasn't looking brimmy enough so I sewed two sides up. I loves it! Then I did a row of sc on the outside of the hat and above the brim, which I think gives it a really polished look. I took a lot of pics from alot of angles bc I loves it!
Hats...and Shoes?!
Giving what the public wants: more hats and more Marty.
Check it out on Nike's website ... my boy is a celeb.
I give him free hats so my work can be seen when the paparazzi snap.
Sunday, December 21, 2008
Hats A-go-go!
Hi TeaBeans blog fans (all one of you)! This weekend I was a hat factory, producing overtime. It was blizzardy in this NYC so I picked up a load of cozy yarn and made hats all weekend long! Since I normally don't have time to make so many crafties, I am going to post hats every week to give you something to read since everyone complains that my blog isn't worth reading because I post so sporadically and infrequently. Jerks. Anyways, enjoy the fiesta de sombreros in the upcoming weeks!
Monday, December 8, 2008
Creeping Rose Vine Cardigan
Here is my first attempt at a cardigan. I initially was going to make it very long with two pockets on either side of the opening and half-sleeves. I used this free pattern from Lion Brand Yarn as the foundation. It was a very easy-to-follow pattern, using mostly 2 dc in one ch to make a "V-stitch." After I made the sweater to the lengths I wanted, I decided it needed more flair than just pockets. I found a leaf pattern in the book Crocheting School: A Complete Course, using that for the right side (with the big rose).
I modified the pattern for the left side (with the two little roses). The leafs were made by chaining and using slst, sc, hdc, dc, tch, dc, hdc, sc, slst in a row, varying the number of each in the sequence, to make the arch. I used a rosette pattern also from Lion Brand Yarn's site. I stitched the roses and vines to the sweater using a needle--nothing fancy. I may add buttons, but for now, I like the sweater open. It's called the Creeping Rose Vine.
Sunday, November 23, 2008
Molly Crinkle Leg Warmers
In California, the waves are big, the palm trees are leafy, and the ankles get chilly at night. By special request, I present to you the Molly Crinkle Leg Warmers.
Ch to height, then dch the length of the row of chs, turn, dch back on the outside loop of the first row of dch. Do this to fit the leg, and stitch up the seam. And there you have it! Ribbed to stretch around your calves, Molly Crinkle Leg Warmers, modelled by the lady who's the Crinkle Leg's namesake.
Tuesday, October 28, 2008
Sunday in Greenwich Sweater Dress
Before I started this dress, two things happened. 1) I saw a dress in a Free People catalogue that was insanely expensive and a very simple knit. 2) I saw a pattern dress online that looked pretty easy. When I went to KnitNY, I spent a solid 20 minutes looking at yarn; and coincidentally when I went home the colors were similar to the dress in the catalogue. I figured I could modify the pattern, and it might end up looking like the dress I wanted to buy. The Free People dress is to the right. You know, the well-crafted dress worn by the model. My dress came out similarly enough; and unfortunately cost probably as much, doesn't look as good, and took a really long time to make. Success! I copied a pattern that crocheted tch in rounds from the neck down. I didn't like the see-through, beach-cover look so I switched to sch, and started ignoring the pattern. At the end, I alternated 2 rows sch with 1 row tch for the cool finish. Plus, apparently I have to have a look so different that I need to alter the pattern...just in case someone I know (a) knows how to crochet (b) buys the same color yarn and (c) has the same pattern. It could happen. Check it out. I am pretty happy with how it turned out, but it is a little too short to wear with stockings. I call it Sunday in Greenwich. Guess when and where we took the photos. (Photo Credits: Iron Martin 2008)
Thursday, October 9, 2008
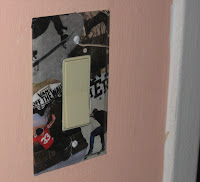
"On the Wall" Switch Plate
Katiebeans always wanted to decorate a light switch plate, and when I dropped by the hardware store yesterday to pick up a surge protector, I picked one up for a buck. I immediately decided to paper mache/decoupage it. I tore out some skate pictures from Thrasher, dipped them in a mix of water and clear Elmer's School Glue, and stuck them to the plate. As it dried, I smoothed out the images and wrapped them around the back and through the front. While still wet, I applied a layer of glue with my finger. I let it dry over night on a stand so it didn't stick to anything flat. I screwed through the paper into the wall. This is called the "On the Wall" Switch Plate.
Friday, September 26, 2008
Bear Mountain Rings
This series of rings is called the "Bear Mountain Rings," in honor of the hardest race I will ever run in my life. The Bear Mountain Half Marathon was an "endurance challenge" sponsored by NorthFace. It was not so much a run as climbing up and down 90 degree mountian sides, dodging fallen branches, falling off slippy boulders, breaking ankles on rocks, and sliding down mudslides. I was in so much pain that Katiebeans had to apply deliciously scented Bengay for days. It was not the leisurely trail jog Katiebeans had envisioned. (Sidenote: Iron Martin just said, "blog-nobbing.") Regardless, these rings embody the lovely Thoreau-esque submersion in nature Katiebeans had hoped for when eagerly heading to the race, clapping her hands and telling her buddy Tony how fun the race would be for them. Well even Tony, who is the most positive, happy go lucky person I have met, was bitter at race end. Katiebeans is especially bitter that the hardest race she ever ran didn't hand out finisher medals. I digress.
Both of these rings were made from old jewelry. The New Leaf was an army medal purchased at a vintage store, and the Flutterby was one of two hair pins my Aunt Erin gave me as a little girl. With pliers, I broke off excess metal, and with excess metal (actually electrical wire and regular wire, respectively), I made rings. Nothing special or particularly difficult, but I think perfect for adding subtle and unique style to an outfit.
Thursday, September 25, 2008
Saturday, September 20, 2008
Kathleen Vintage Button Earrings
A while back Katiebeans purchased some button-style earrings from Urban Outfitters. The earrings were on sale for very cheap, but originally priced close to $12. Katiebeans loved the earrings, but almost immediately they broke. The earrings were easily repairable with a hot glue gun, so Katiebeans figured, why not make her own real vintage button earrings for cheap?
I bought about 4,000 earring backs from a craft store and set out for Go Fish! in Brooklyn to find some cheap vintage buttons. The buttons were ridiculously cheap and ridiculously awesome. I lalalalalove the color and plaid texture of the Bay Blue Buttons. The Wedding White really stand out when you wear them, and they also have a very cool texture. The Galaxy Black Buttons are shiney and swirly.
Some of the buttons I bought had metal protruding (to be sewn to clothing, in the normal fashion for buttons). I broke the metal with pliers, and the earring backs were big enough to cover over any dangerous metal shards. All I did was apply hot glue, and Voila! Kathleen Vintage Button Earrings a-go-go. I bought extras in case they broke; and while only one actually broke so far, an unforseen accident involving a Wedding White earring and black eye makeup also rendered the spares useful!
Wednesday, September 17, 2008
Cherry On Top Lampshade
Say Hella to the Cherry On Top Lampshade.
Went to Goodwill to grab me some plates to smash; and what did I see as I waited in a long long line reading Nick & Norah but an awesome cherry print Anne Taylor dress. Perfect for a lampshade for my new owly lamp! Iron Martin surprised me with a killer shadeless owl lamp when I was a coughing bronchiosauras (he knows I'm an owl fan), and I've been on a search for the perfect shade since. When I was in Sonoma soaking up the sun, I saw some amazing shades from Found Images. I thought maybe I could buy one or make something cool. Since I already had a lampshade that I had painted water color on, I decided to strip 'er nekky and clothe 'er in cherries.
I hurt my back in the process, but crafties are worth it! I love my new owly cherry lamp! I used a #2 perfect glue , which happened to bind fabric and metal--fortuitous for Katiebeans as it was the only perfect glue I had left. The bottom was measured to fit the base. Taking the top part of the fabric as a square, I glued four corners equidistant from each other like a mini square on the top ring of the shade. I folded the excess fabric over.
Tuesday, February 5, 2008
Blushing Flame Floves
HELLA. Katiebeans here to announce the long-awaited coming of the Blushing Flame Floves. Over a year ago Katiebeans started making herself some awesome fingerless gloves from some awesome pink/orange/black speckles yarn. Until that point, she had only made squares out of double chain...blankets, purses, scarves that looked like crap. Then when her awesome friend & Theta-baby Tiff was sleeping on her awesome couch, making an awesome blanket, she taught Katiebeans how to make rows of crochet that go back and forth (not just in circles). This revolutionized crochet, and Katiebeans decided she could make a super complicated article of clothing without any pattern whatsover. Making it up as she goes along is her crochet style.
This winter, Katiebeans picked up her bag of 5 awkwardly-shaped and mismatched pink/orange/black speckled floves from last season and set forth making two cute, matching floves. After a bottle of wine, a season of The Office, and three movies with Brooke, Katiebeans has finally completed her dream of farking awesome floves. BEHOLD:
Ok so this picture proves there is one flove, but trust lady Katiebeans: there be two. The wrist is hdc on the back loop only (to fit) then stictched up the side with sc. The hand is dch with turns to fit, as are the fingers. They aren't a perfect fit because Katiebeans was trying to eat cookies and crochet at the same time, but did you expect them to fit like a GLOVE?!?!
Friday, January 4, 2008
CircleVK Mosaic Cross
Welcome to the viewing of Katiebeans's first commissioned piece, the CircleVK Mosaic Cross. After seeing my owl table, my aunt requested a green and maroon cross for her ranch in Texas. The ranch is pretty country-home in decor so I wanted the cross to look rustic.
I ordered a hideous teal colored cross with a wooden dove glued on the front off of ebay. I pried the dove off, chiseling away at the hot glue that was attractively visible around the edges of the dove. $10 well spent. Then I created a design on a paper outline with pre-cut stone mosaic pieces from an art supply store. I applied pre-mixed grout to the cross and pressed on the stone pieces.
I am happy with the result, but the grout is a little too white to feel rustic to me.
I Feel Electric Pink Lumberjack Hat
As I post this post, I am wearing the Electric Pink Lumberjack Hat. Inspired by the fur lumberjack hats walking around this NYC (see right), I, Katiebeans, figured I could make something similar with a little more funk.
The Electric Pink started out as hdc in rounds with increases. The back and earflaps are dc in turns with 2 rows of grey in sc for the faux fur trim. The faux fur front flap is actually a "fur" stitch made using sc around a knitting needle. While I don't normally condone crochet hooks mingling with knitting needles, I was down with the result.
What do you think? Urban Lumberjack? Did I capture the style? The streets may not be ready for the funk yet, but you better believe my apartment is.
Subscribe to:
Posts (Atom)